How to import AI-generated websites from Kimi to Figma
Kimi.com lets you build fully designed, responsive websites from a plain-language description — no code, no drag-and-drop, no design experience required. Describe your idea, and Kimi’s AI generates a live, multi-page site complete with layouts, copy, imagery, and clean production-ready code, right inside your browser. The challenge? Getting that design out of Kimi and into Figma for deeper refinement, stakeholder feedback, or further collaboration.
This is where html.to.design comes in. Pair the html.to.design Chrome extension with the Figma plugin, and you can capture your Kimi-generated site exactly as it renders in the browser — then pull it straight into Figma as fully editable layers. No screenshots. No manual rebuilding. No copy-pasting code.
From Kimi to Figma — Quick Guide
- Open Kimi.com and generate a website using a text prompt
- Preview your generated site in the browser
- Capture the page using the html.to.design Chrome extension
- Finish the import with the html.to.design Figma plugin
- Your Kimi design lands in Figma as fully editable, layered frames — ready to refine
What is Kimi?
Kimi.com is an AI assistant and agentic platform developed by Moonshot AI, powered by their K2.5 model. Among its many capabilities, Kimi includes a dedicated website builder that turns natural language prompts into structured, multi-page websites with conversion-ready copy, responsive layouts, reusable sections, and clean front-end code — all deployable and shareable instantly.
Where many AI website tools generate a single landing page and call it done, Kimi’s agentic approach can build out multi-page site structures from a single prompt, making it particularly useful for designers looking for a fast, high-quality starting point to bring into a proper design tool.
html.to.design bridges that last step. By reading the live HTML and CSS as rendered in your browser, it captures every spacing value, color, and typographic detail exactly as Kimi intended — then imports it all into Figma as editable layers.
How to import from Kimi to Figma: Step-by-step
Step 1: Generate your website in Kimi
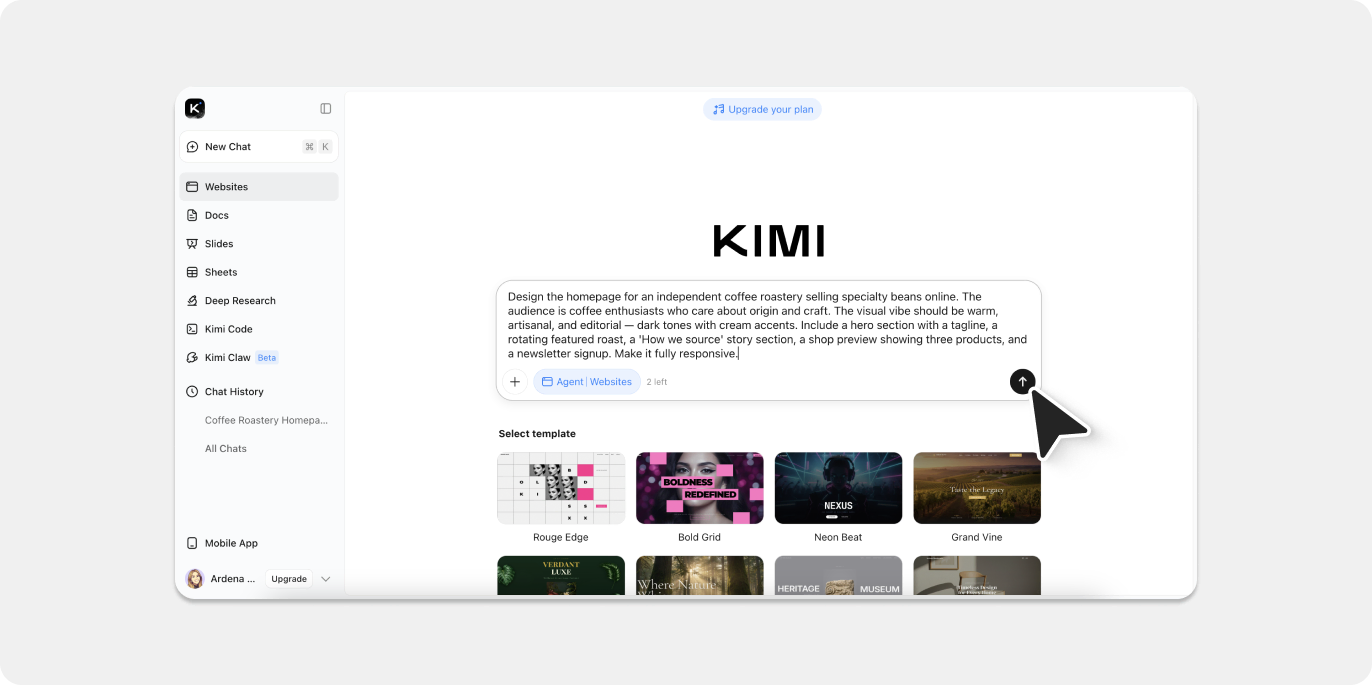
Head to kimi.com and open the Websites tool. Enter a description of the site you want to build — the more specific you are about audience, structure, and visual direction, the closer the result will be to your vision. For this guide, we used the following prompt:
“Design the homepage for an independent coffee roastery selling specialty beans online. The audience is coffee enthusiasts who care about origin and craft. The visual vibe should be warm, artisanal, and editorial — dark tones with cream accents. Include a hero section with a tagline, a rotating featured roast, a ‘How we source’ story section, a shop preview showing three products, and a newsletter signup. Make it fully responsive.”
Kimi processes the prompt and produces a live, styled preview with generated layouts, placeholder copy, imagery, and a cohesive visual theme — all ready to view in the browser.
Step 2: Preview your design in the browser
Once Kimi has generated your site, make sure the preview of your site is open on the right side of the browser. You don’t need to publish or export anything — html.to.design works directly from the live rendered page, so just having it open on screen is enough.
💡 First time? Make sure you’ve installed both the html.to.design Chrome extension and the html.to.design Figma plugin before getting started.
Step 3: Capture with the html.to.design Chrome extension
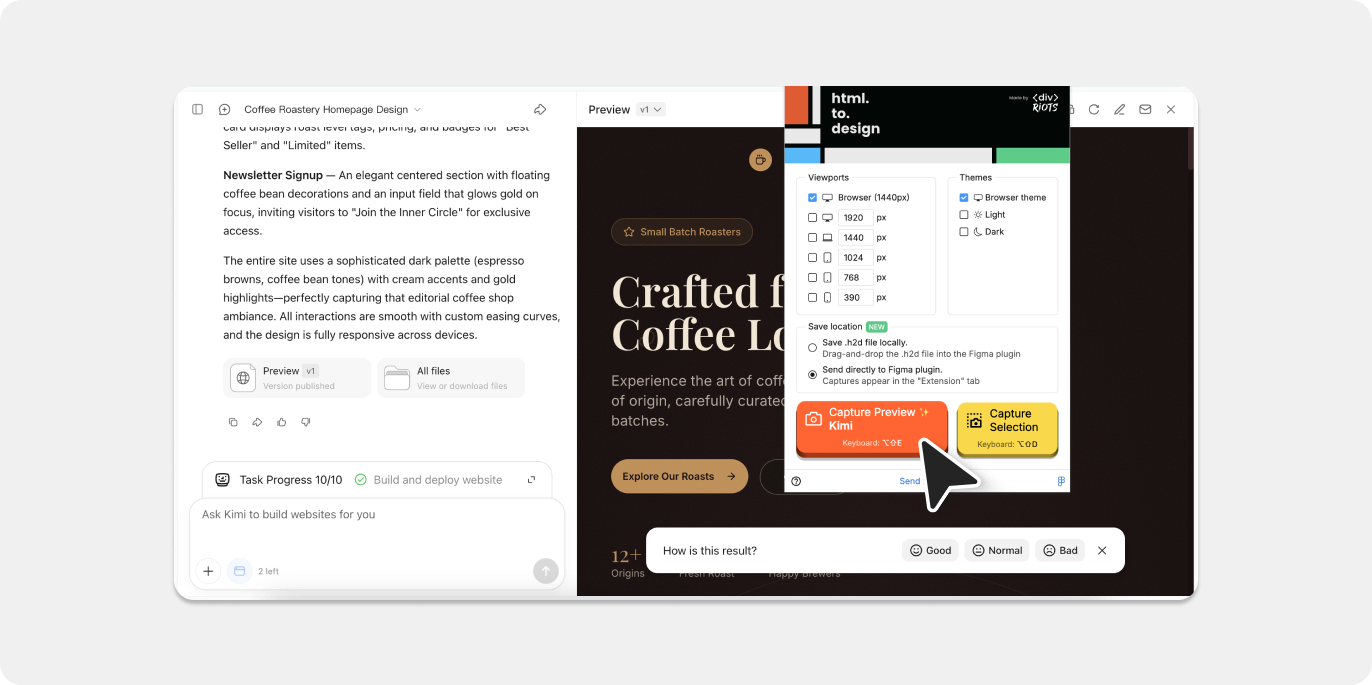
With your Kimi site preview open, click the html.to.design icon in your Chrome toolbar. The extension popup will appear — select your target viewport (desktop, tablet, or mobile) and hit Capture.
When prompted on how to handle the capture, choose “Send directly to Figma plugin” to push the design straight into your active Figma file.
The extension reads the live HTML and CSS from the page, so everything is captured exactly as rendered.
Step 4: Import your Kimi design to Figma
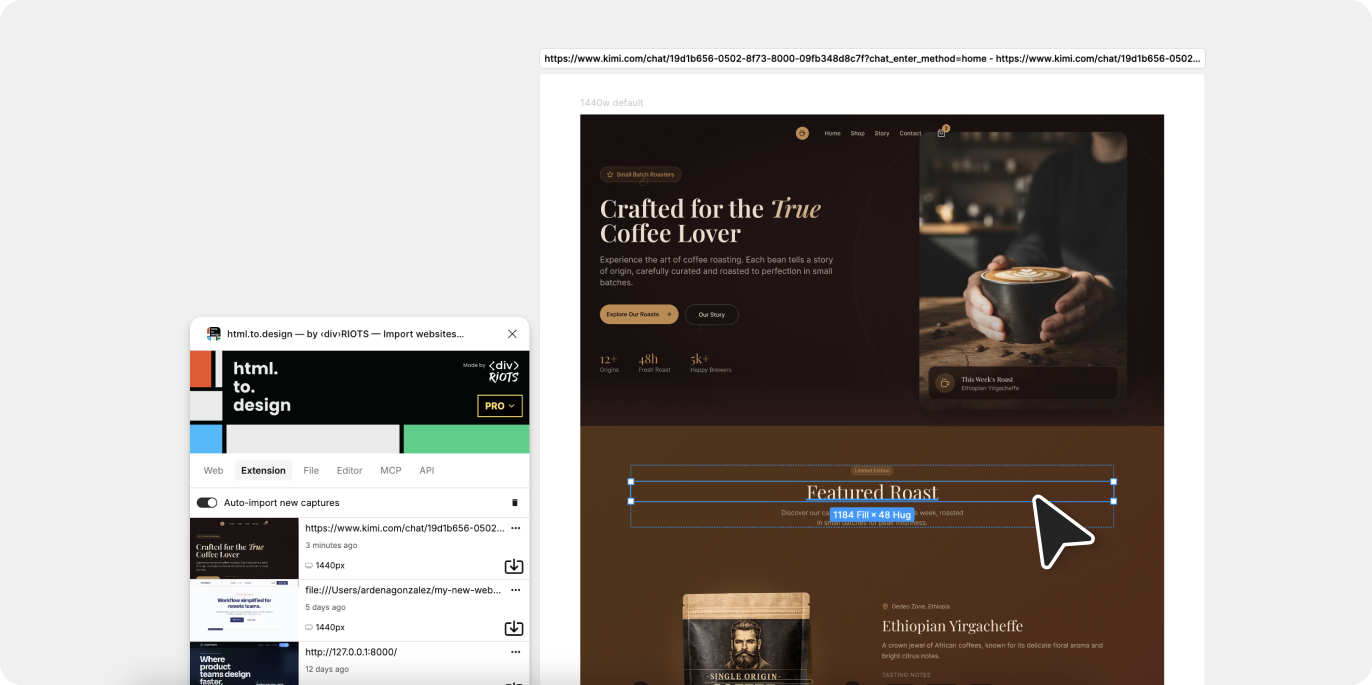
Switch over to Figma and open the html.to.design plugin. Your captured Kimi design will be waiting under the Extension tab. Hit the import icon, and within moments your AI-generated page is converted into layered, editable Figma frames.
No files to download. No manual tracing. The entire web-to-Figma conversion happens seamlessly in the background.
💡 Pro tip: Keep the html.to.design Figma plugin open while you capture in the browser, and the import will kick off automatically as soon as the capture completes.
Step 5: Edit and refine in Figma
From here, the design is entirely yours. Edit text layers, adjust colors, tweak spacing, apply auto-layout, swap in real brand assets, connect components from your design system, or prepare the file for developer handoff — all within your existing Figma workflow, without touching a line of code.
Why bring Kimi designs into Figma?
Kickstart your design process
Kimi handles the heavy lifting of generating structured layouts, copy, and visual hierarchy from scratch. Rather than starting with an empty Figma artboard, you arrive with a visually complete, production-quality design you can immediately build on — a real advantage when exploring multiple directions early in a project.
Full editing control
Everything imported into Figma is fully editable. No locked groups, no flattened rasters — just clean frames, vectors, and text layers ready for your refinements and brand polish.
Rapid iteration
Generate several site variants in Kimi using different prompts or visual directions, import the strongest contenders into Figma, and compare them side by side. Evaluating different concepts takes minutes, not hours.
Bring your team in
Figma’s collaboration tools let you share imported designs with clients and stakeholders, collect feedback through comments, and iterate together in real time — slotting Kimi’s AI-generated output directly into your team’s existing review workflow.
Try it out
Generate a design in Kimi.com, grab it with the html.to.design extension, and take it further in Figma.
With Kimi and html.to.design, you can go from a text prompt to a fully editable Figma file in under a minute.
Kimi is one of many AI tools that work seamlessly with html.to.design. Check out guides for importing from Anything.com, Readdy.ai, Lovable, Claude AI, and more.
FAQ
Q: Does html.to.design work with Kimi’s free plan?
A: Yes. The html.to.design extension captures whatever Kimi renders in your browser preview, regardless of which plan you’re on. No paid Kimi subscription is required to use this workflow.
Q: How is this different from exporting code directly from Kimi?
A: Exporting code gives you raw HTML and CSS to build with — that’s a developer workflow. html.to.design captures the live rendered page visually and converts it into editable Figma layers, so designers can keep refining without ever touching code.
Q: What happens with the fonts Kimi uses?
A: html.to.design preserves font metadata during the import. Fonts served via Google Fonts or standard web-safe stacks will display correctly in Figma. For less common custom fonts, you may need to install them locally in Figma after importing.
Q: Can I import just one section instead of the whole page?
A: Absolutely. The html.to.design extension includes a selection tool that lets you target specific areas of the page — useful for pulling in just a hero section, a pricing block, or a single UI component without importing the entire layout.