How to import web designs from Readdy.ai to Figma
Readdy.ai lets you describe a website in plain language and get a fully designed, production-ready result in minutes. It renders live HTML and CSS directly in the browser — complete with layouts, imagery, typography, and responsive design — all without writing a single line of code. But once your design is ready, getting it into Figma for refinement, collaboration, or handoff isn’t always obvious.
That’s where html.to.design comes in. With the html.to.design Chrome extension and Figma plugin, you can capture your Readdy.ai-generated design as it renders in the browser and import it directly into Figma as fully editable layers — no screenshots, no manual rebuilding, no copy-pasting code.
From Readdy.ai to Figma — Quick Guide
- Open Readdy.ai and generate your website design with a text prompt
- While previewing your Readdy design in the browser, capture it using the html.to.design Chrome extension
- Finish importing your design with the html.to.design Figma plugin
- Your design arrives in Figma as fully editable layers, ready to refine
What is Readdy.ai?
Readdy.ai is an AI-powered website builder that generates complete websites — layouts, content, images, and styling — from a plain language prompt. It also supports generating designs from templates, screenshots, or URLs. Once generated, designs can be refined through a conversational interface or a visual drag-and-drop editor, and the result can be published instantly, exported as clean HTML or React code.
Readdy is popular with entrepreneurs, small teams, and agencies who need to go from concept to polished web design in a fraction of the time traditional tools require. While Readdy does offer its own built-in Figma export on paid plans, the html.to.design approach gives you pixel-perfect fidelity by capturing the live rendered page directly — preserving every spacing value, color, and style rule exactly as it appears in the browser.
How to import from Readdy.ai to Figma: Step-by-Step
Step 1: Generate your design in Readdy.ai
Head to Readdy.ai and start a new project. Type a description of the website you want — the more specific your prompt, the more polished the result. For this guide, we used the following prompt:
“Design the homepage of a babysitting agency web app that helps families find childcare professionals in their area. The target audience is busy parents looking for childcare for their kids. The design vibe should be earthy, familial and happy using a warm color palette of bright colors. Include a hero section, a section featuring 5-star babysitters, a service list with what sets the agency apart, and a clear ‘Book Now’ button. Ensure it is responsive.”
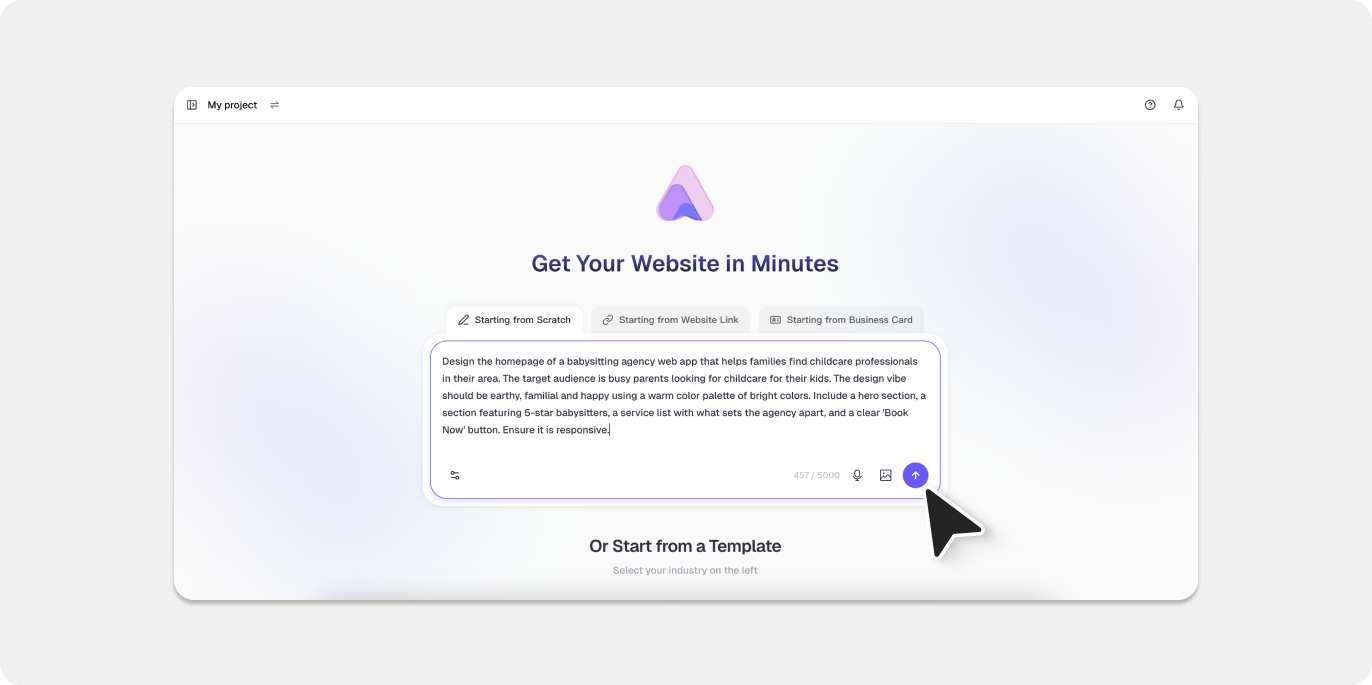
Readdy’s AI processes your prompt and renders a live preview complete with layout, auto-generated imagery, placeholder copy, and styling. It even proposes a logo for your site that you can refine until you’re happy with it!
Step 2: Open your design in a full browser tab
Once your design has rendered in Readdy’s editor, click the ‘Share’ button to open the live preview in a full browser tab. This ensures html.to.design captures the cleanest possible version of the page.

💡 First time? Make sure you’ve installed both the html.to.design Chrome extension and the html.to.design Figma plugin before starting.
Step 3: Capture with the html.to.design browser extension
In your full-tab preview, click the html.to.design icon in your Chrome toolbar to open the extension popup. Select your preferred viewport width — desktop, tablet, or mobile — then click Capture.
When prompted, choose “Send directly to Figma plugin” to push the design straight into your open Figma file.
The extension captures the live HTML and CSS from the page so everything is preserved exactly as Readdy rendered it.

Step 4: Import Readdy designs to Figma
Switch over to Figma and open the html.to.design plugin. Your captured Readdy design will appear under the Extension tab. Click the import icon, and within moments your AI-generated design is converted into fully layered, editable Figma frames.
No intermediate file downloads, no copy-pasting code, no manual tracing. The extension handles the transfer entirely in the background.
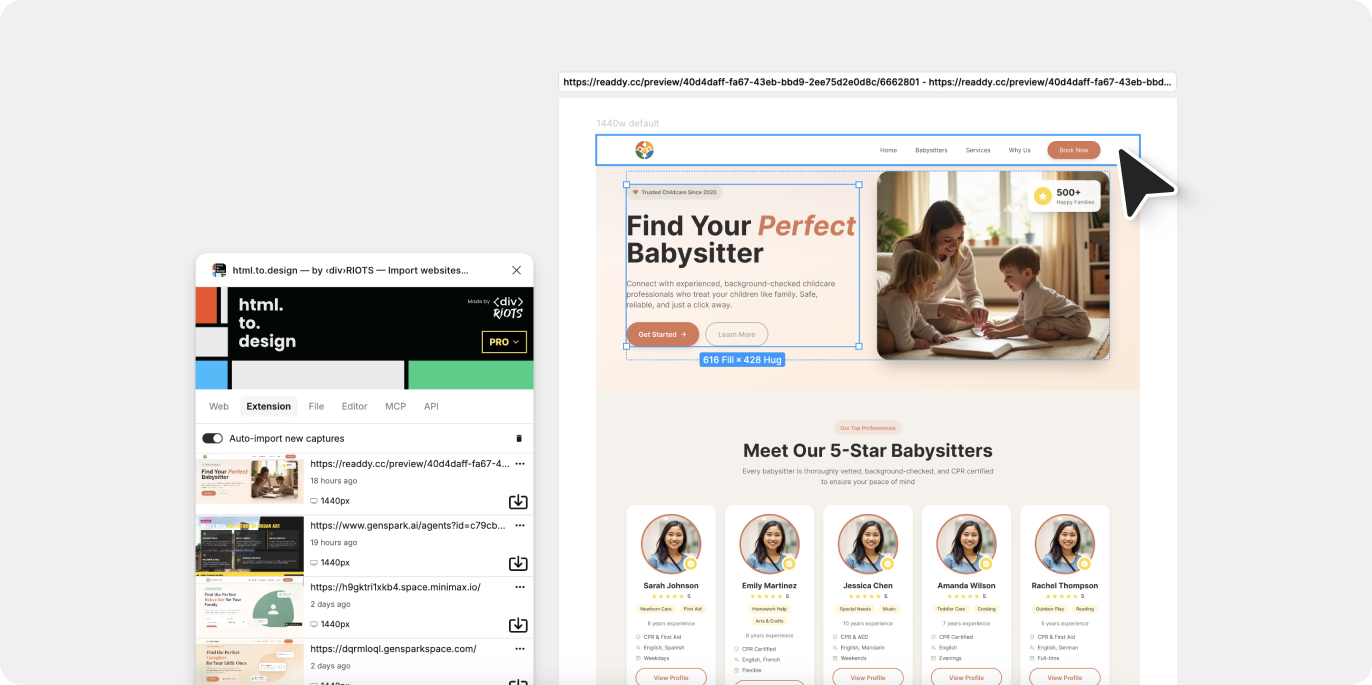
💡 Pro tip: Keep the html.to.design Figma plugin running while you capture in the browser, and your design will begin importing automatically.
Step 5: Edit in Figma
Once imported, every element is yours to work with. Update text layers, adjust colors, resize frames, apply auto-layout, swap in real brand assets, connect components from your design system, or prepare the file for developer handoff — all within your existing Figma workflow.
Why import Readdy.ai designs into Figma?
Bootstrap early exploration
Readdy handles the heavy lifting of initial layout and content generation. Instead of starting from zero in Figma, you arrive with a working, visually coherent design that you can immediately build on — especially useful in early project phases when you need to explore multiple directions fast.
Precise editing control
Once inside Figma, every element is editable. No locked layers, no flattened images — just clean, adjustable frames and text ready for your refinements and brand polish.
Iterate quickly
Generate multiple design variations in Readdy, import the strongest candidates into Figma, and compare them side by side. Testing different directions is far faster than building each from scratch.
Collaborate with your team
Figma’s collaboration features let you share imported designs with your team, gather feedback through comments, and iterate together in real time — bringing your AI-generated concepts directly into the team’s existing workflow.
Try it out
Generate a design in Readdy.ai, capture it with the html.to.design Chrome extension, and refine it in Figma.
With Readdy.ai and html.to.design, you go from prompt to fully editable Figma file in under a minute.
Readdy.ai is one of many AI tools supported by html.to.design. Check out our guides for importing designs from Lovable, Claude AI, and more.
FAQ
Q: Does html.to.design work with Readdy.ai’s free plan?
A: Yes. The html.to.design extension captures whatever Readdy renders in your browser preview, regardless of your Readdy plan tier. You don’t need a paid Readdy account to use this workflow.
Q: How is this different from Readdy’s built-in Figma export?
A: Readdy’s native Figma export (available on paid plans) exports directly from Readdy’s internal data model. html.to.design captures the live rendered page in the browser, which can offer higher visual fidelity since it reflects exactly what you see — including any dynamic styles, web fonts loaded at runtime, and image assets as rendered.
Q: What if my Readdy design uses custom fonts?
A: html.to.design preserves font metadata. If the fonts are web-safe or loaded via Google Fonts, they will appear correctly in Figma. For other custom fonts, you may need to install them locally in Figma after importing.
Q: Can I capture individual sections instead of the full page?
A: Yes. The html.to.design extension includes a selection tool that lets you capture specific parts of the page rather than the full layout — useful for importing individual hero sections, pricing tables, or component patterns.