From MiniMax Agent to Figma. Turn AI-generated website designs to Figma layers
If you’re experimenting with the new MiniMax M2.5 and eager to get those designs in Figma, there’s now a direct way to go from MiniMax Agent to Figma.
The problem? Figma does not natively support importing designs from MiniMax Agent. With the html.to.design Chrome extension, you can capture your MiniMax Agent-generated UI and import it directly into Figma as fully editable layers — no screenshots, no manual rebuilding, no copy-pasting code.
What is MiniMax Agent?
MiniMax Agent is an AI-powered tool from MiniMax that lets users generate web interfaces, landing pages, slide decks and application UIs through conversational prompts. It renders live previews of generated designs directly in the browser, making it a powerful platform for rapid prototyping and design ideation. Designers and developers use it to go from idea to working UI mockup in seconds — but until now, getting those mockups into a professional design tool like Figma required a bit of extra work.
From MiniMax to Figma - Quick Guide
- Open MiniMax Agent and generate your UI design with a text prompt
- While previewing your MiniMax Agent designs, capture using the html.to.design Chrome extension
- Finish importing your MiniMax designs with the Figma plugin
- Your designs are imported as fully editable layers, ready to customize
How to import from MiniMax Agent to Figma: Step-by-Step
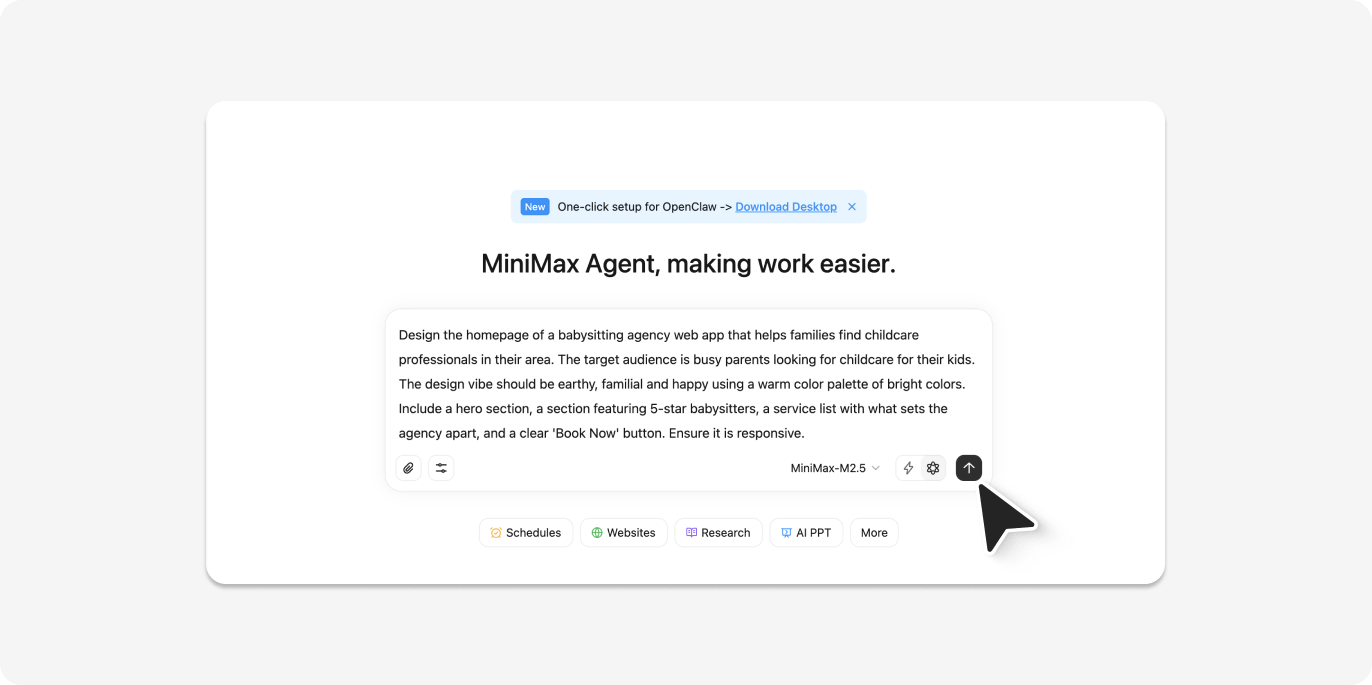
Step 1: Generate your design in MiniMax Agent
Head to MiniMax Agent and start a new project. Describe the UI or type of slides you want in natural language — the more specific, the better. For our example, we used the following prompt:
“Design the homepage of a babysitting agency web app that helps families find childcare professionals in their area. The target audience is busy parents looking for childcare for their kids. The design vibe should be earthy, familial and happy using a warm color palette of bright colors. Include a hero section, a section featuring 5-star babysitters, a service list with what sets the agency apart, and a clear ‘Book Now’ button. Ensure it is responsive.”
MiniMax Agent processes your prompt and renders a live preview complete with layout, placeholder content, and styling. Let it finish generating before moving to the next step.
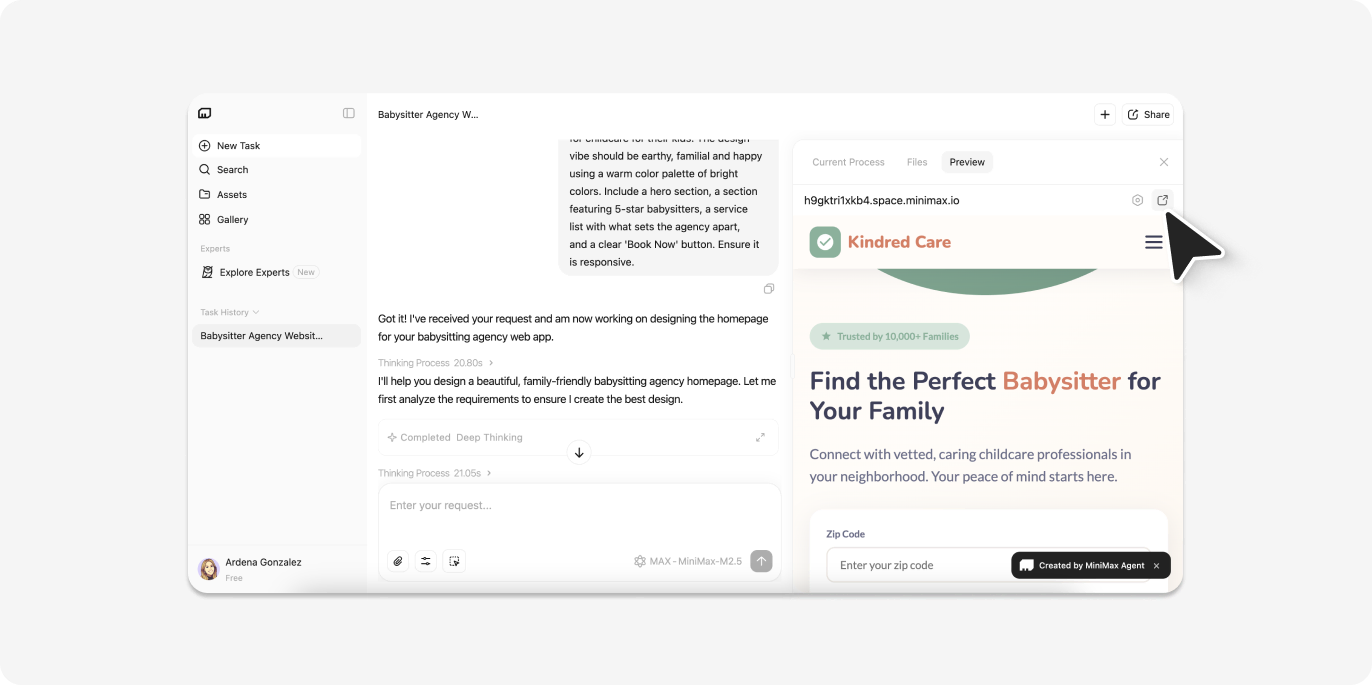
Step 2: Preview your MiniMax designs in a new tab
In the ‘Preview’ panel on the right, find the icon to open your preview in a new tab. This launches your MiniMax website designs in a new tab and at your full browser width.
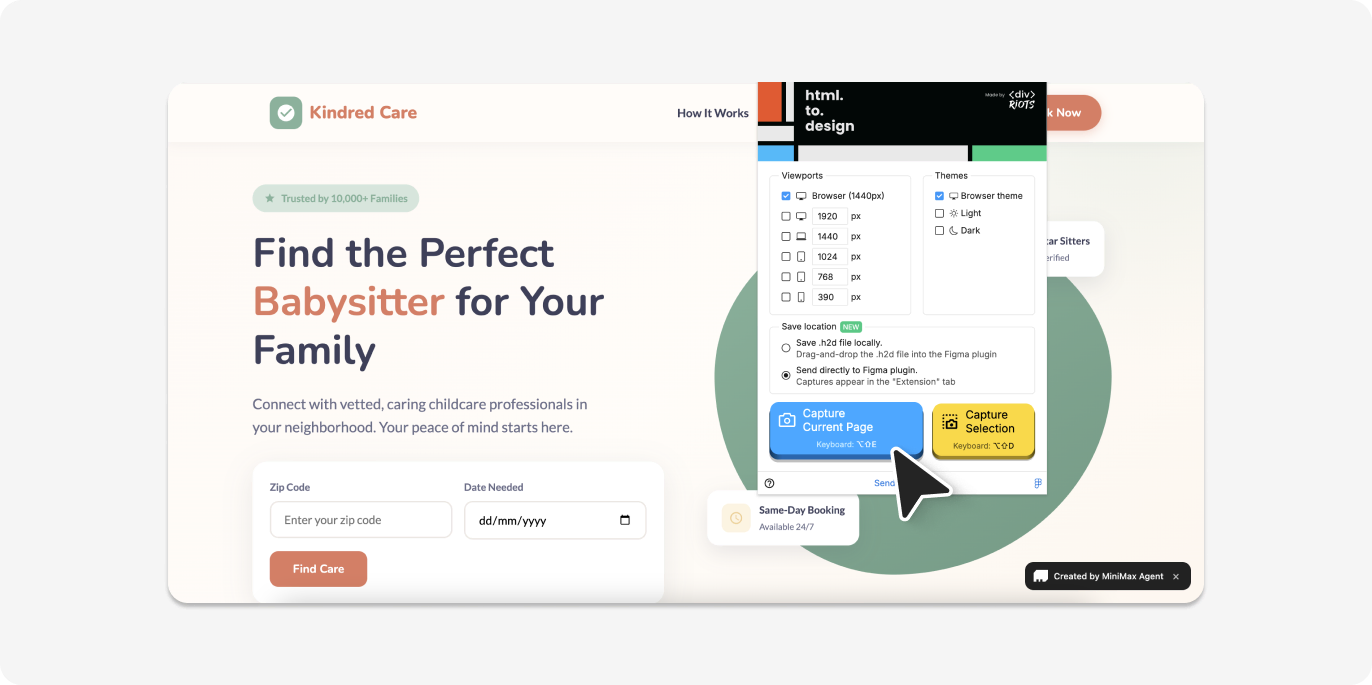
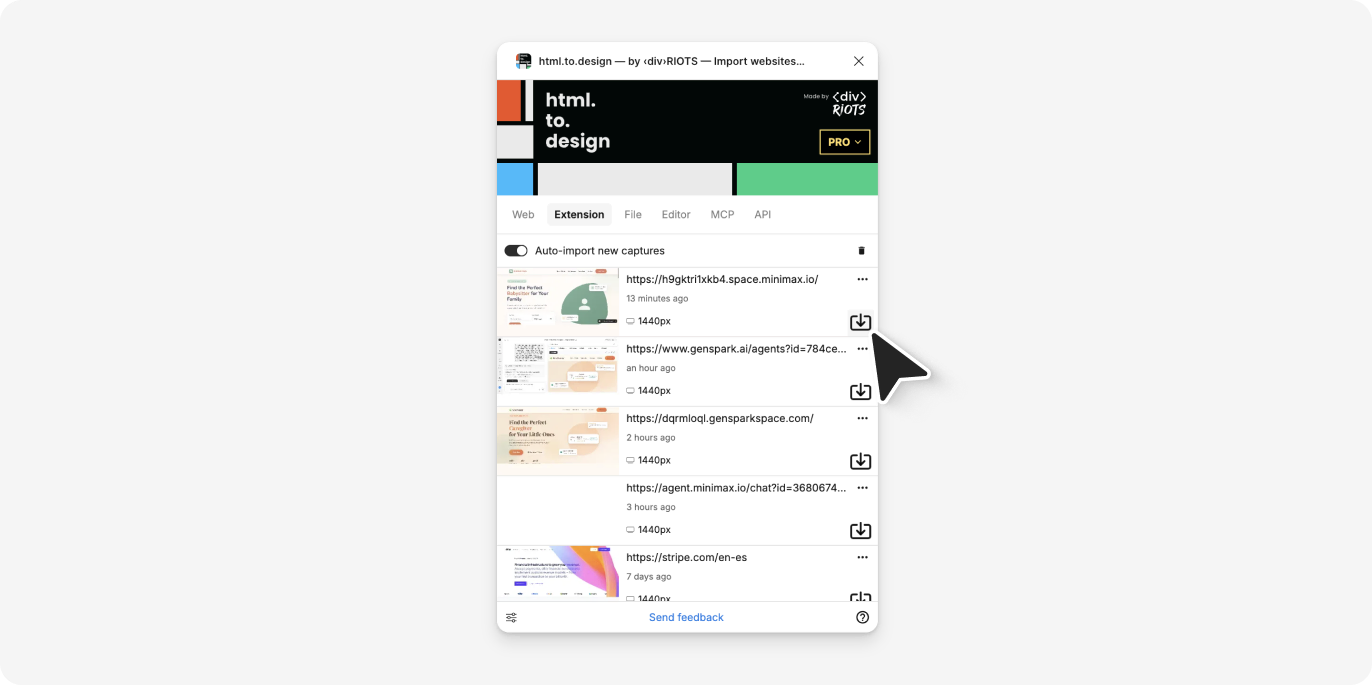
Step 3: Capture with the html.to.design browser extension
In this new preview tab, click the html.to.design extension icon in your Chrome toolbar.
In the extension popup, select your preferred viewport width — desktop, tablet, or mobile — then click Capture. Choose “Send directly to Figma plugin” to push the design straight to your open Figma file.
The extension captures the current state of the rendered page. This works because html.to.design reads the actual live HTML and CSS from the page — not a flat screenshot — so every element, spacing value, and style rule is preserved.
💡 First time? Make sure you’ve installed both the html.to.design Chrome extension and the html.to.design Figma plugin before starting.
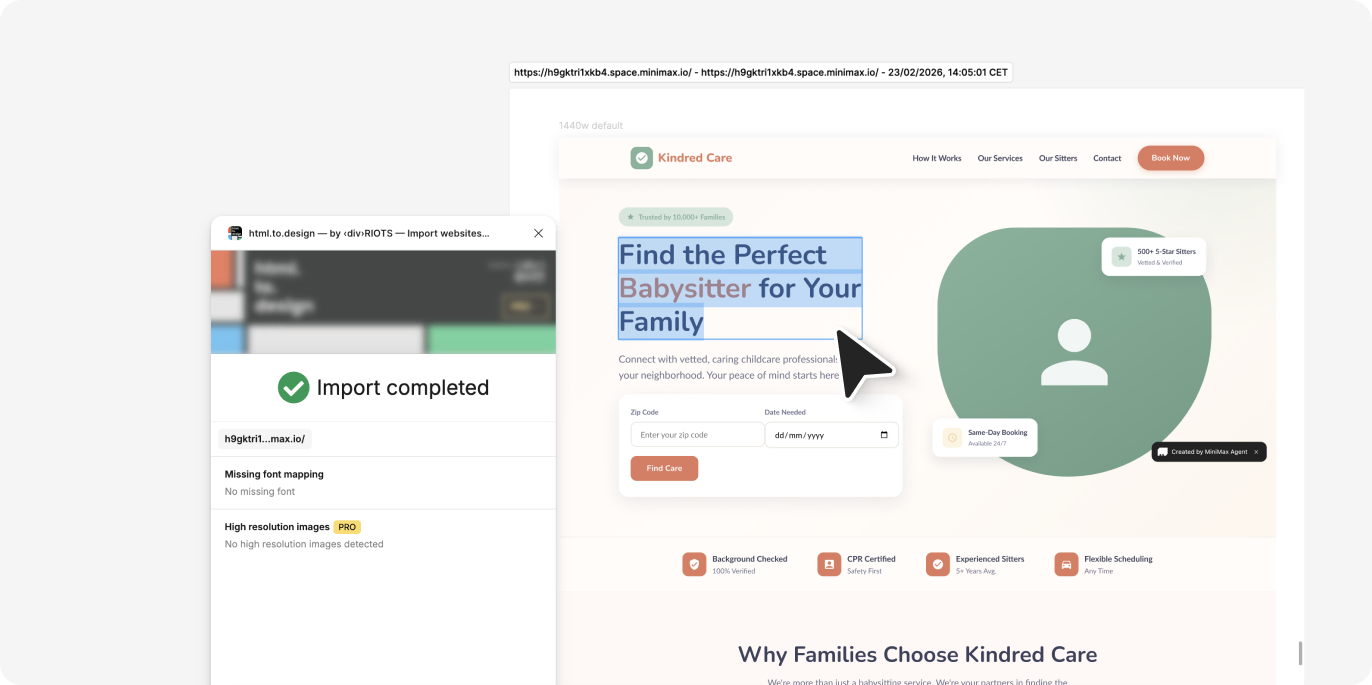
Step 4: Import MiniMax designs to Figma
Switch to Figma and open the html.to.design plugin. Your imported MiniMax Agent design appears under the Extension tab. Click the import icon, and your AI-generated UI becomes a fully layered, editable Figma file.
No file downloads, no intermediate steps, no copy-pasting code. The extension handles the transfer entirely in the background.
💡 Pro tip: Keep the html.to.design plugin running in Figma while you capture the page, and your design will begin importing automatically.
Step 5: Edit in Figma
Every element is yours to edit: update text layers, swap colors, resize frames, apply auto-layout, connect your design system components, or prepare for developer handoff — all within your existing Figma workflow.
Alternative method: Copy-paste code
Prefer to skip the Chrome extension? html.to.design also supports a code-paste workflow:
- In MiniMax Agent, access or export the HTML/CSS code for your generated design
- Copy the code to your clipboard
- Open the html.to.design Figma plugin
- Select the Editor tab
- Paste the code and click Import
This method works for any valid HTML output. However, for most users, the Chrome extension is the fastest path rendering the highest-quality results.
Why import MiniMax Agent designs into Figma?
Skip the blank canvas MiniMax Agent handles the initial ideation and layout. Instead of starting from zero, you get a working UI in seconds that you can immediately build on — especially valuable during early project phases when you need to explore multiple directions quickly.
Full editing control Once inside Figma, every element becomes editable. No locked layers, no flattened images — just clean, adjustable components ready for your refinements.
Rapid iteration Generate multiple variations in MiniMax Agent, import the strongest ones to Figma, and compare side-by-side. Test different design directions faster than building each from scratch.
Team collaboration Figma’s collaboration features let you share imported designs with your team, gather feedback through comments, and iterate together in real time — bringing AI-generated ideas directly into your team’s workflow.
Try it out
Generate a UI in MiniMax Agent, capture it with the html.to.design Chrome extension and refine it in Figma
Stop rebuilding AI-generated designs from scratch. With MiniMax Agent and html.to.design, you go from prompt to editable Figma file in seconds.
MiniMax Agent is one of over 20 AI tools supported by html.to.design. Check out our guides for importing designs from Claude AI, Lovable and more!
FAQ
Q: Does html.to.design work with all MiniMax Agent outputs?
A: Yes. The extension captures whatever MiniMax Agent renders in the browser preview, regardless of the type of UI or component you prompted.
Q: What if my MiniMax Agent design uses custom fonts?
A: html.to.design preserves font metadata. If the fonts are web-safe or loaded via Google Fonts, they will appear correctly in Figma. For other custom fonts, you may need to install them locally in Figma after importing.