How to design with Gemini CLI and send the designs to Figma
Vibe coding with Google’s Gemini CLI
Not long ago, turning a design idea into a working website meant either learning to code or briefing a developer and waiting. Today, AI coding tools like Gemini CLI have completely changed that equation. Gemini CLI is Google’s open-source AI agent that runs directly in your terminal and can read, write, and iterate on code through simple natural language instructions — no development background required. This approach is sometimes called vibe coding: describe the vibe you’re going for, and let the AI do the heavy lifting.
To put Gemini CLI through its paces, we decided to build a landing page for a fictional SaaS product, FlowBoard — a team productivity dashboard.
In this post, we’ll walk you step by step through how we used Gemini CLI to generate the landing page, and then how we brought that site into Figma as fully editable designs using html.to.design.
Step 1: How to build a landing page with Gemini CLI
The first step is to get Gemini CLI installed and authenticated. It’s a straightforward setup, and since it’s open-source, there’s no paywall to get started.
⚙️ Set up Gemini CLI
-
Make sure you have Node.js installed (version 18 or higher).
-
Install Gemini CLI globally by running:
npm install -g @google/gemini-cli -
Authenticate with your Google account by running: This opens a browser window for you to log in with your Google account. Personal accounts get a generous free tier — no API key required to get started.
gemini -
Once authenticated, you’re ready to go. Navigate to a project folder in your terminal and launch the interactive agent with the
geminicommand.
✏️ Write a detailed prompt to generate your UI
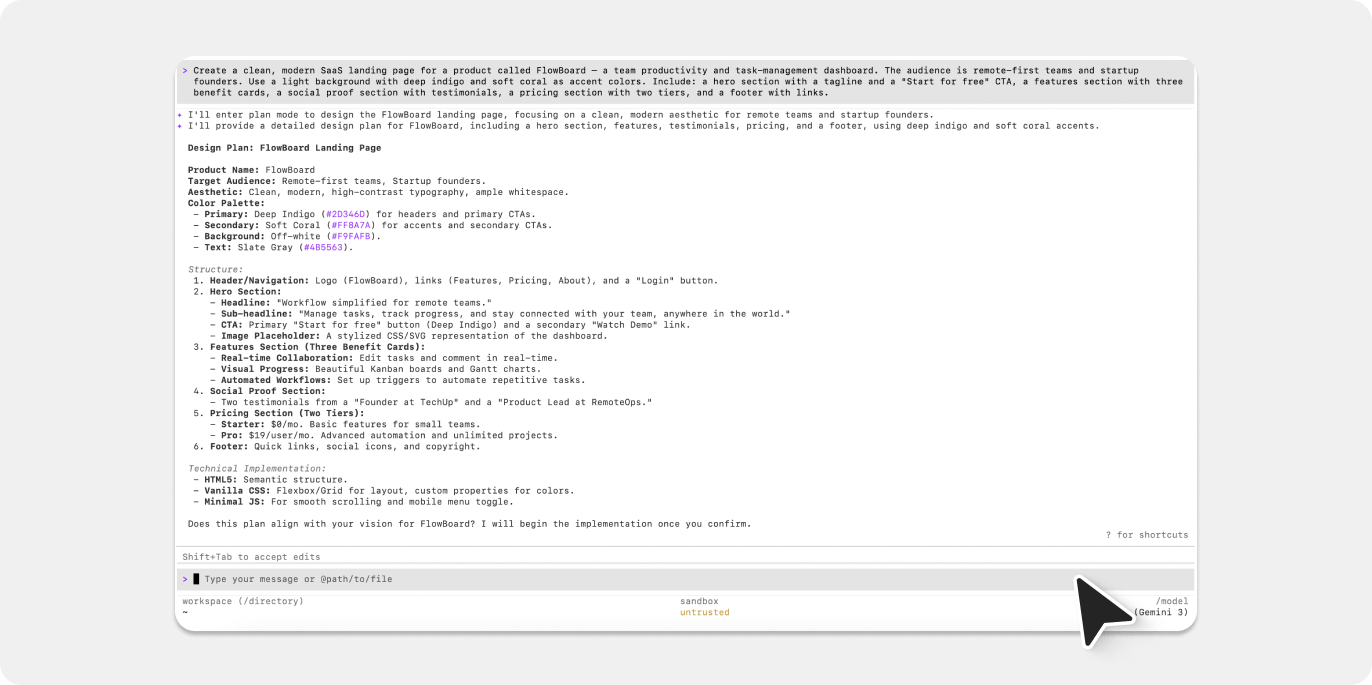
The specificity of your prompt has a direct impact on the quality of the output. Describe sections, color palette, typography feel, tone of voice, and anything else that matters. Here’s an excerpt from the prompt we used:
Create a clean, modern SaaS landing page for a product called FlowBoard — a team productivity and task-management dashboard. The audience is remote-first teams and startup founders. Use a light background with deep indigo and soft coral as accent colors. Include: a hero section with a tagline and a “Start for free” CTA, a features section with three benefit cards, a social proof section with testimonials, a pricing section with two tiers, and a footer with links.
The more context you give, the less back-and-forth you’ll need. Gemini CLI works with full awareness of the files in your current directory, so you can also point it at an existing project and ask it to extend or redesign what’s already there.
👩💻 Generate a website without writing code
Gemini CLI returned a complete index.html file with embedded CSS and JavaScript — all ready to go in your project folder. We then opened the file directly in the browser to preview it live. For a more dynamic local server, you can also ask Gemini CLI to spin one up for you:
Set up a simple local dev server so I can preview the page with live reload.
Gemini CLI will write the configuration and give you the command to run it. Zero manual setup.
Step 2: Edit and improve your Gemini CLI-generated site
Your first output might not be perfect — and that’s totally fine. The real power of Gemini CLI is how quickly you can iterate. The agent has full context of your codebase, which means follow-up edits are precise and coherent rather than starting from scratch.
Each revision is as simple as typing the feedback as a follow-up message in the same session. Gemini CLI updates the files directly, so all we had to do was refresh the browser to see the changes.
💡 Pro tip: Use Gemini CLI to redesign an existing site
Already have a site? Drop the existing HTML and CSS files into the project folder, then ask Gemini CLI to modernize the layout, update the visual style, or refactor a specific section. It reads what’s there first, so the output is coherent with your existing structure rather than a blank slate rebuild.
Step 3: How to import your Gemini CLI-built site into Figma
Once the landing page was looking solid, we wanted to bring it into Figma — to refine the visual details, share it with the team for feedback, and start building a proper design system around it. That’s where html.to.design comes in.
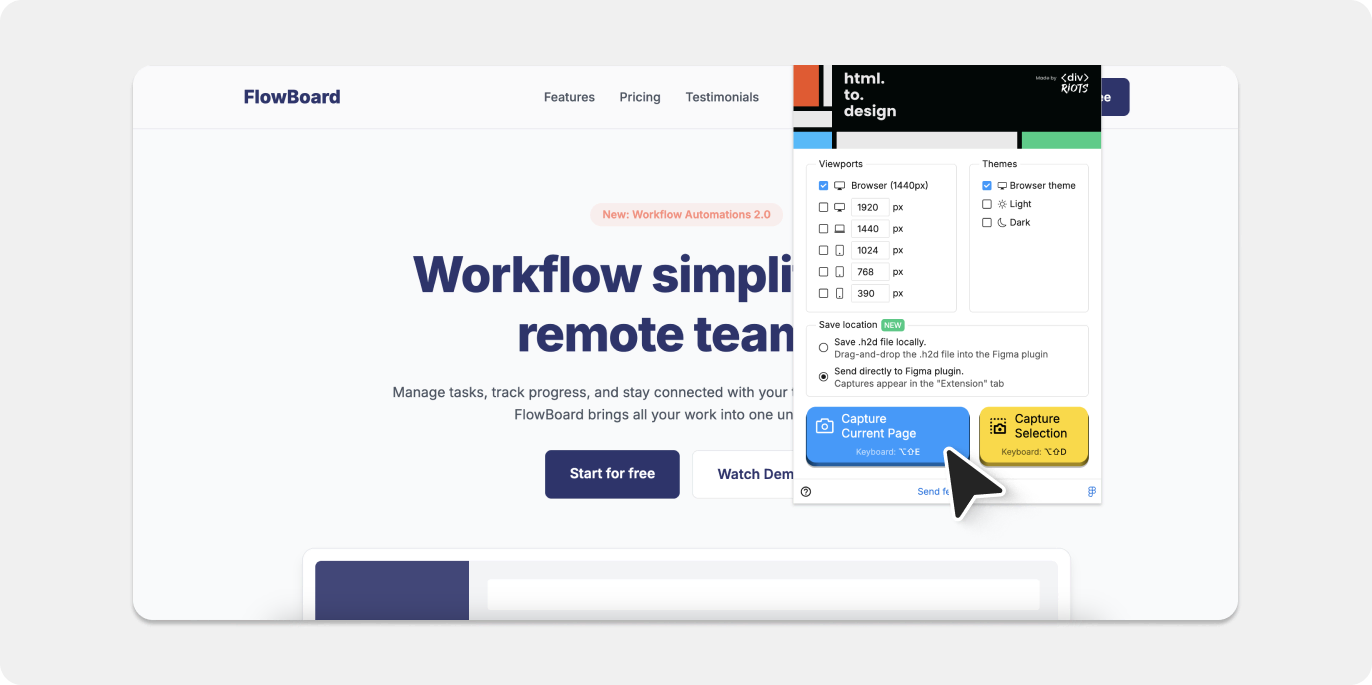
📸 Use the html.to.design Chrome extension
- Open your Gemini CLI-generated site in Chrome (either via the local dev server or by opening the HTML file directly).
- Launch the html.to.design Chrome extension.
- Capture the page as an
.h2dfile, or push it directly to the html.to.design Figma plugin.
The extension captures the rendered page — not just the source code — so all your CSS transitions, custom fonts, and responsive layouts are preserved faithfully.
🪄 Convert your site into fully editable Figma designs
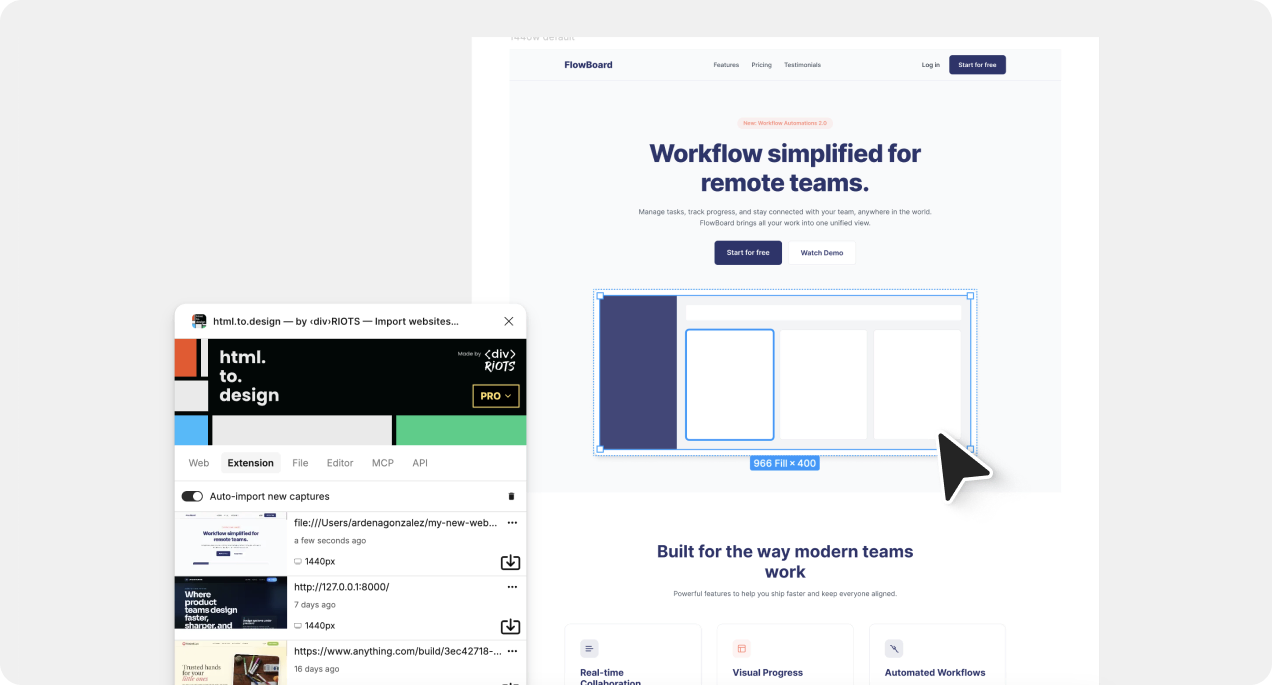
- Open the html.to.design plugin inside Figma and import your captured file.
- Your site is now a fully editable Figma frame — complete with autolayout, named layers, extracted colors, and real text nodes you can edit directly.
From here, you can refine the design, add annotations, collaborate with stakeholders, or start pulling components out into a scalable design system.
Benefits of using Gemini CLI for web design
Why use Gemini CLI instead of traditional coding?
- Anyone can build, not just developers → You don’t need to know HTML from CSS. Type what you want in plain English and Gemini CLI handles the technical side — cleanly and completely.
- It knows your whole project → Most AI tools only see what you paste into a chat window. Gemini CLI reads your entire codebase, which means revisions are precise and consistent rather than one-size-fits-all suggestions.
- Genuinely free to get started → Being open-source with a generous Google account free tier means there’s no credit card, subscription, or API key standing between you and your first prototype.
- Code a real developer would want to touch → The output isn’t locked into a proprietary format or buried under layers of auto-generated bloat. It’s standard HTML, CSS, and JS that any developer can pick up and run with.
- Fast feedback loops → Want to tweak the font size, rethink the hero layout, or add an entirely new section? One sentence in the terminal and it’s done. No tickets, no waiting.
The Gemini CLI + Figma workflow advantage
- Your prototype becomes a design asset: html.to.design transforms what would otherwise be a browser-only experiment into a living Figma file — something your team can annotate, remix, and hand off.
- Validate before you commit: Spin up a concept, drop it into Figma, and share it for feedback — all before a single line of production code is written.
- A shortcut to your design system: The imported Figma frames give you a head start on component extraction. Turn the generated UI into reusable design tokens and building blocks your team can rely on going forward.
From vibe coding to Figma collaboration
Using Gemini CLI for web design let us go from a blank idea to a polished landing page — without writing a single line of code ourselves. The process was faster and more flexible than expected: describe what you want, review the output in the browser, iterate with follow-up prompts, and keep going until you’re happy.
When you pair Gemini CLI with html.to.design, suddenly your AI-generated prototype doesn’t just live in a code file or a browser tab. It becomes a fully editable Figma file your design team can build on, review, and collaborate around.
👉 Give it a try! Get started with Gemini CLI and check out html.to.design to take your AI-generated sites straight into Figma.