How to design with OpenAI Codex and send the designs to Figma
Vibe coding with OpenAI Codex
Not long ago, building a website meant either writing code yourself or hiring someone who could. Today, AI coding tools like OpenAI Codex have completely changed the equation. Codex is OpenAI’s coding agent that can read, edit, and run code. It understands natural language and translates your descriptions into working HTML, CSS, and JavaScript — no development background required. This approach is sometimes called vibe coding: describe the vibe you’re going for, and let the AI handle the rest.
To put Codex through its paces, we decided to build a landing page for a fictional design conference, DesignSprint Summit.
In this post, we’ll walk you step by step through how we used OpenAI Codex to generate the landing page, and then how we brought that site into Figma as fully editable designs using html.to.design.
Step 1: How to build a landing page with OpenAI Codex
The first step is to set up OpenAI Codex with the workflow that suits you best. If you already have an OpenAI account, this setup can be as simple as downloading the Codex app and logging in.
⚙️ Set up OpenAI Codex
Depending on how you use Codex, the set up will be slightly different. These are the main ways to use Codex:
- Codex macOS App (recommended)
- IDE extension
- CLI
- Cloud
We decided to use the Codex app for this test.
✏️ Write a detailed prompt to generate your UI
The specificity of your prompt has a direct impact on the quality of the output. It’s best to describe sections, colors, fonts, tone of voice, and anything else that matters. Here’s an excerpt from the prompt we used:
Create a bold, modern landing page for a design conference called DesignSprint Summit. The event is aimed at UI/UX designers and product teams. Use a dark background with electric blue and white as accent colors. Include: a hero section with the event date and a CTA button, a speakers section with placeholder cards, a schedule/agenda section, a sponsors row, and a footer with social links…
The more context you give, the less back-and-forth you’ll need.
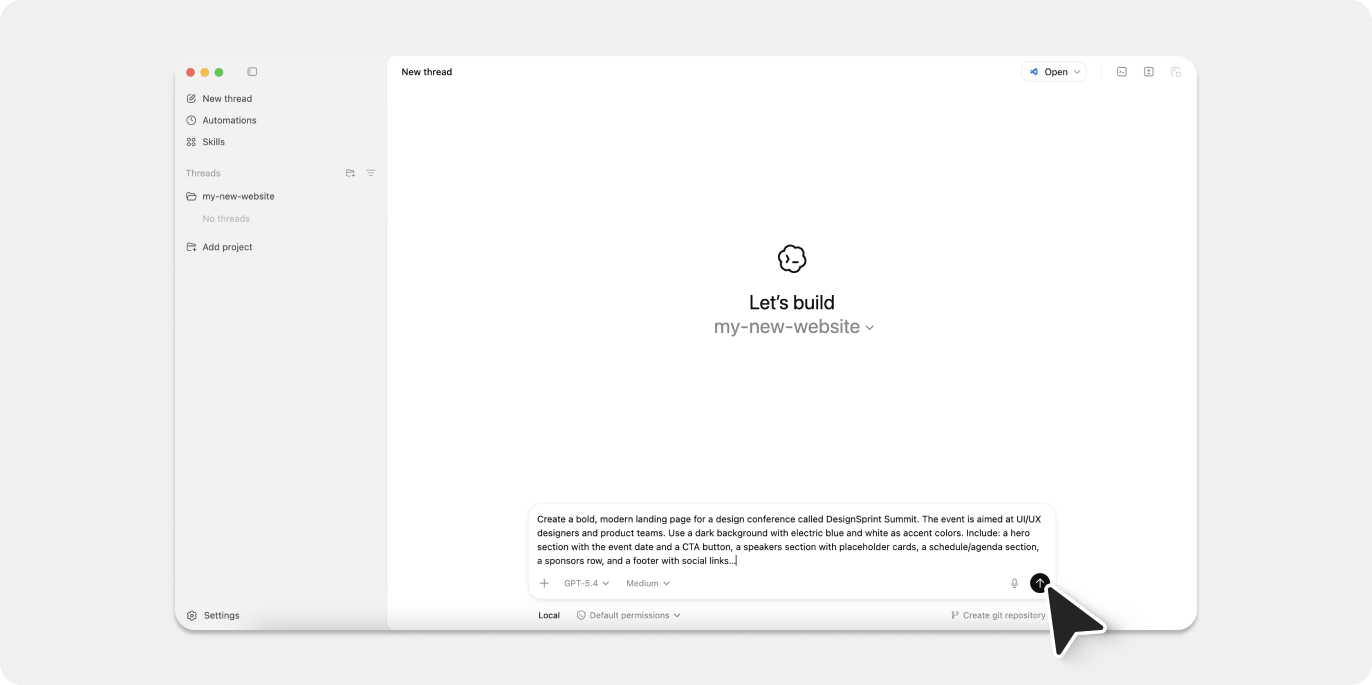
👩💻 Generate a website without writing code
Codex returned complete HTML, CSS, and JavaScript, all ready-to-go in our chosen local project folder. We then simply prompted Codex to run the webpage locally in the browser to view it live.
Step 2: Edit and improve your Codex-generated site
Your first output might not be perfect — and that’s totally fine. The real power of Codex is how fast you can iterate.
📝 How to revise Codex outputs
After reviewing the first draft, we went back to Codex and asked it to:
- Replace placeholder speaker names with more realistic-sounding ones
- Change the hero CTA button from “Learn More” to “Save My Spot”
- Increase contrast on the schedule section for better readability
- Add a sticky navigation bar
Each revision was as simple as pasting our feedback as a follow-up message. Codex updated the code and the local files, so all we had to do was refresh the browser to see the changes.
💡 Pro tip: Use Codex to redesign an existing site
If you already have a site, paste its HTML into the chat and ask Codex to redesign it, modernize it, or refactor specific sections. It’s a great way to explore design directions without touching your production codebase.
Step 3: How to import your Codex-built site into Figma
Once the landing page was in good shape, we wanted to take it into Figma — to refine the visual details, share it with the team, and start building out a proper design system around it. That’s where html.to.design comes in.
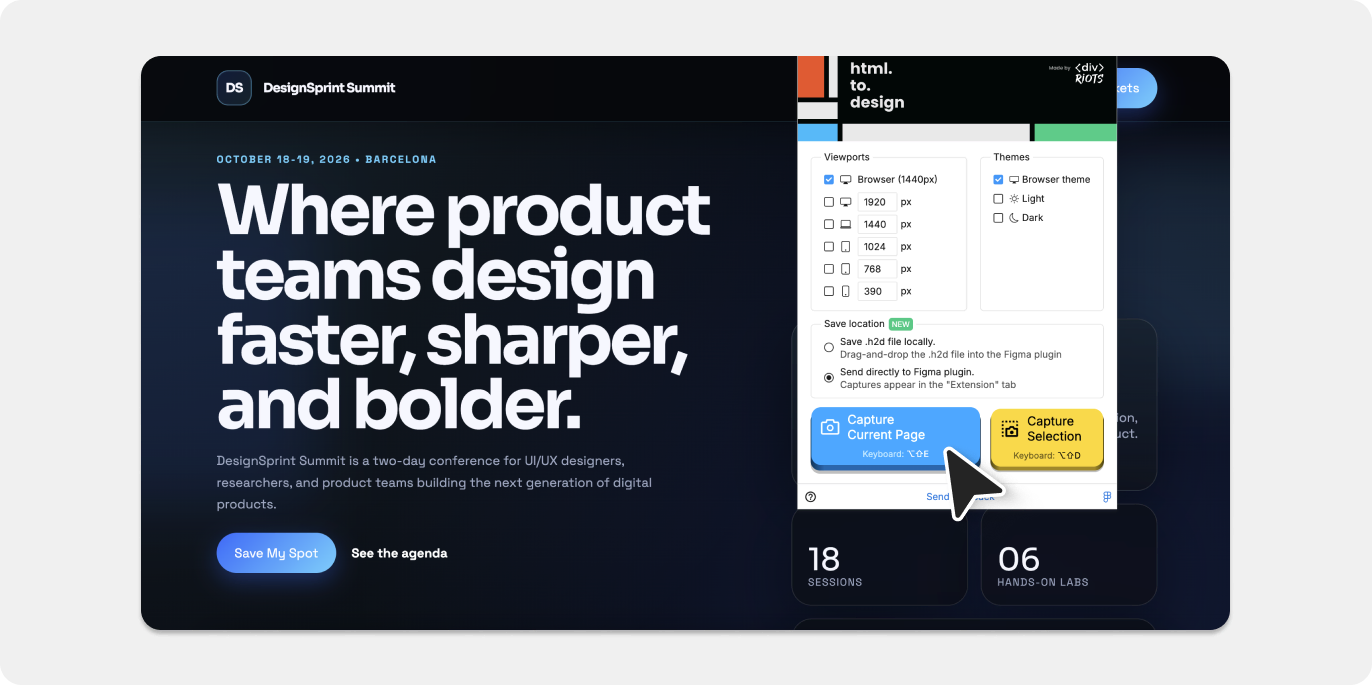
📸 Use the html.to.design Chrome extension
- Run your Codex-generated site locally in the browser.
- Launch the html.to.design Chrome extension.
- Capture the page as an
.h2dfile or push it directly to the html.to.design Figma plugin.
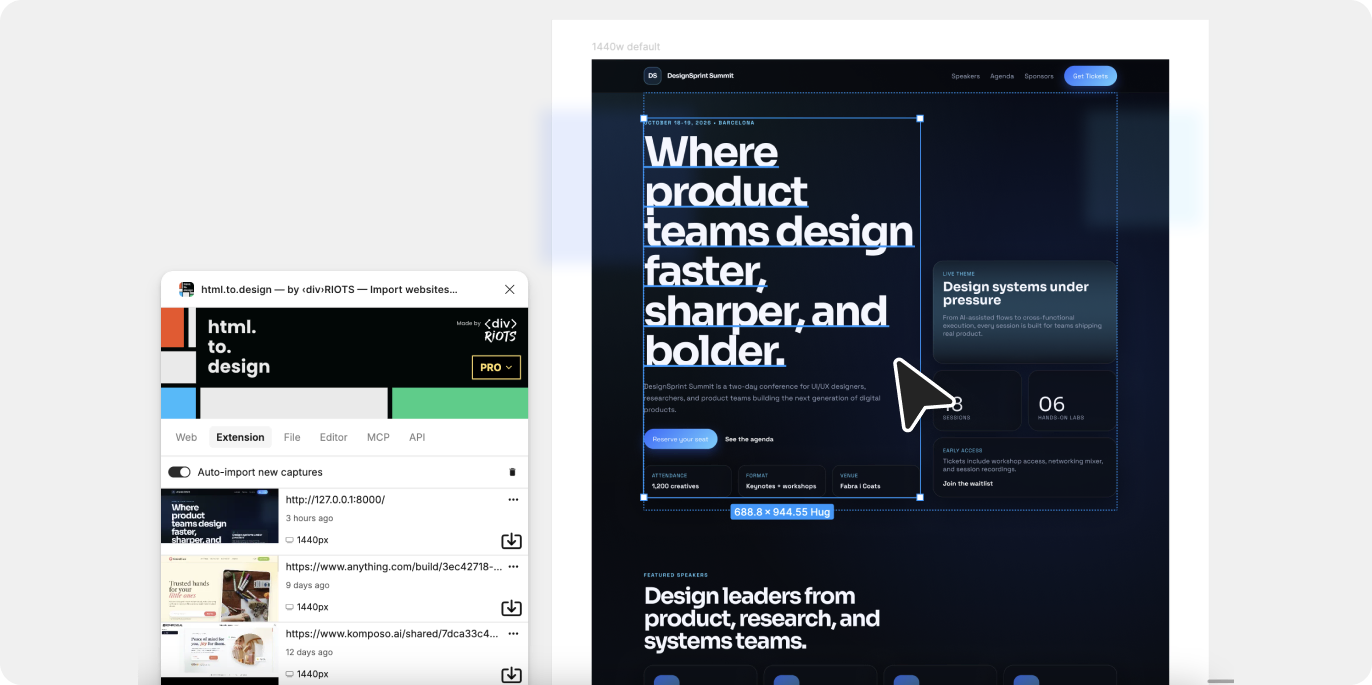
🪄 Convert your site into fully editable Figma designs
- Open the html.to.design plugin inside Figma and import your captured file.
- Your site is now a fully editable Figma frame — complete with auto-layout, named layers, extracted colors, and real text nodes you can edit.
From here, you can polish the design, collaborate with other stakeholders, or start extracting components into a design system.
Benefits of using OpenAI Codex for web design
Why use Codex instead of traditional coding?
- No engineering background needed → Describe what you want in plain English and get working code back.
- Production-ready output → Unlike visual no-code builders that generate messy markup, Codex outputs clean HTML/CSS/JS that developers can actually work with.
- Iterate at the speed of thought → Changes that would take a developer hours now take seconds — just describe the update and regenerate.
- Cross-functional by default → You end up with both a working prototype and (via html.to.design) a Figma file — giving developers and designers something concrete.
The Codex + Figma workflow advantage
- Bridge the design–development gap: With html.to.design, your Codex output doesn’t stay in a code editor — it becomes a collaborative design file your whole team can work in.
- Rapid prototyping: Test ideas and validate concepts in Figma before committing to a full build.
- Design system extraction: Once you’re happy with the design, use Figma’s component tools to turn your generated UI into reusable, scalable design tokens and components.
From vibe coding to Figma collaboration
Using OpenAI Codex for web design let us go from a blank slate to a polished landing page — without writing a single line of code. The process was faster and more flexible than we expected: describe what you want, review the output, iterate with follow-up prompts, and keep going until you’re happy.
The real magic happens when you pair Codex with html.to.design: suddenly your AI-generated prototype doesn’t just live in code or a browser tab. It becomes a fully editable Figma file your design team can build on and review.
Whether you’re a designer exploring a new concept, a marketer who needs a landing page fast, or a product manager prototyping a new feature — vibe coding with OpenAI Codex and html.to.design is a genuinely powerful workflow worth adding to your toolkit.
👉 Ready to give it a try? Start with OpenAI Codex and check out html.to.design to take your AI-generated sites straight into Figma.